This article is the English version of Yuta Takase's blog post.
Table of contents
- Table of contents
- 1. Introduction
- 2. What is YOLO?
- 3. YOLOv8
- 4. YOLOv8 model size
- 5. Changes with YOLOv5
- 6. YOLOv8's building and inference execution
- 7. Overview of the inference results for each model
- 8. Summary
1. Introduction
Hello, I am Takase, a Research Engineer at the RevComm Research division. In this blog post, I will introduce YOLOv8, the famous object detection framework released by Ultralytics in early January 2023. I will also compare the changes with previous versions and show how to run it.
2. What is YOLO?
As many people might know, YOLO is an object detection method proposed in the paper You Only Look Once: Unified, Real-Time Object Detection presented by Joseph Redmon et al. at CVPR2016. The name YOLO stands for You Only Look Once.
YOLO improves the slow processing speed of object detection methods by simultaneously detecting and identifying objects. This feature made it a pioneer in real-time object detection with breakneck inference speed.
This method is a must-see among the various techniques introduced to date for anyone interested in the topic. This article does not provide a detailed explanation of YOLOv8 – there are already superb explanatory materials on the internet.
3. YOLOv8
YOLOv8 is the latest version of the YOLO model released by Ultralytics, the publisher of YOLOv5. YOLOv8 allows object detection, segmentation, classification tasks, and training on large data sets. It can run on a variety of hardware, including CPUs and GPUs.
It also features a new backbone, loss function, anchor-free detection head, and backward compatibility, allowing us to switch between different versions and compare performance. Currently, v3, v5, and v8 configurations are available in the official repository.
As of this writing, the YOLOv8 paper is yet to be published.
4. YOLOv8 model size
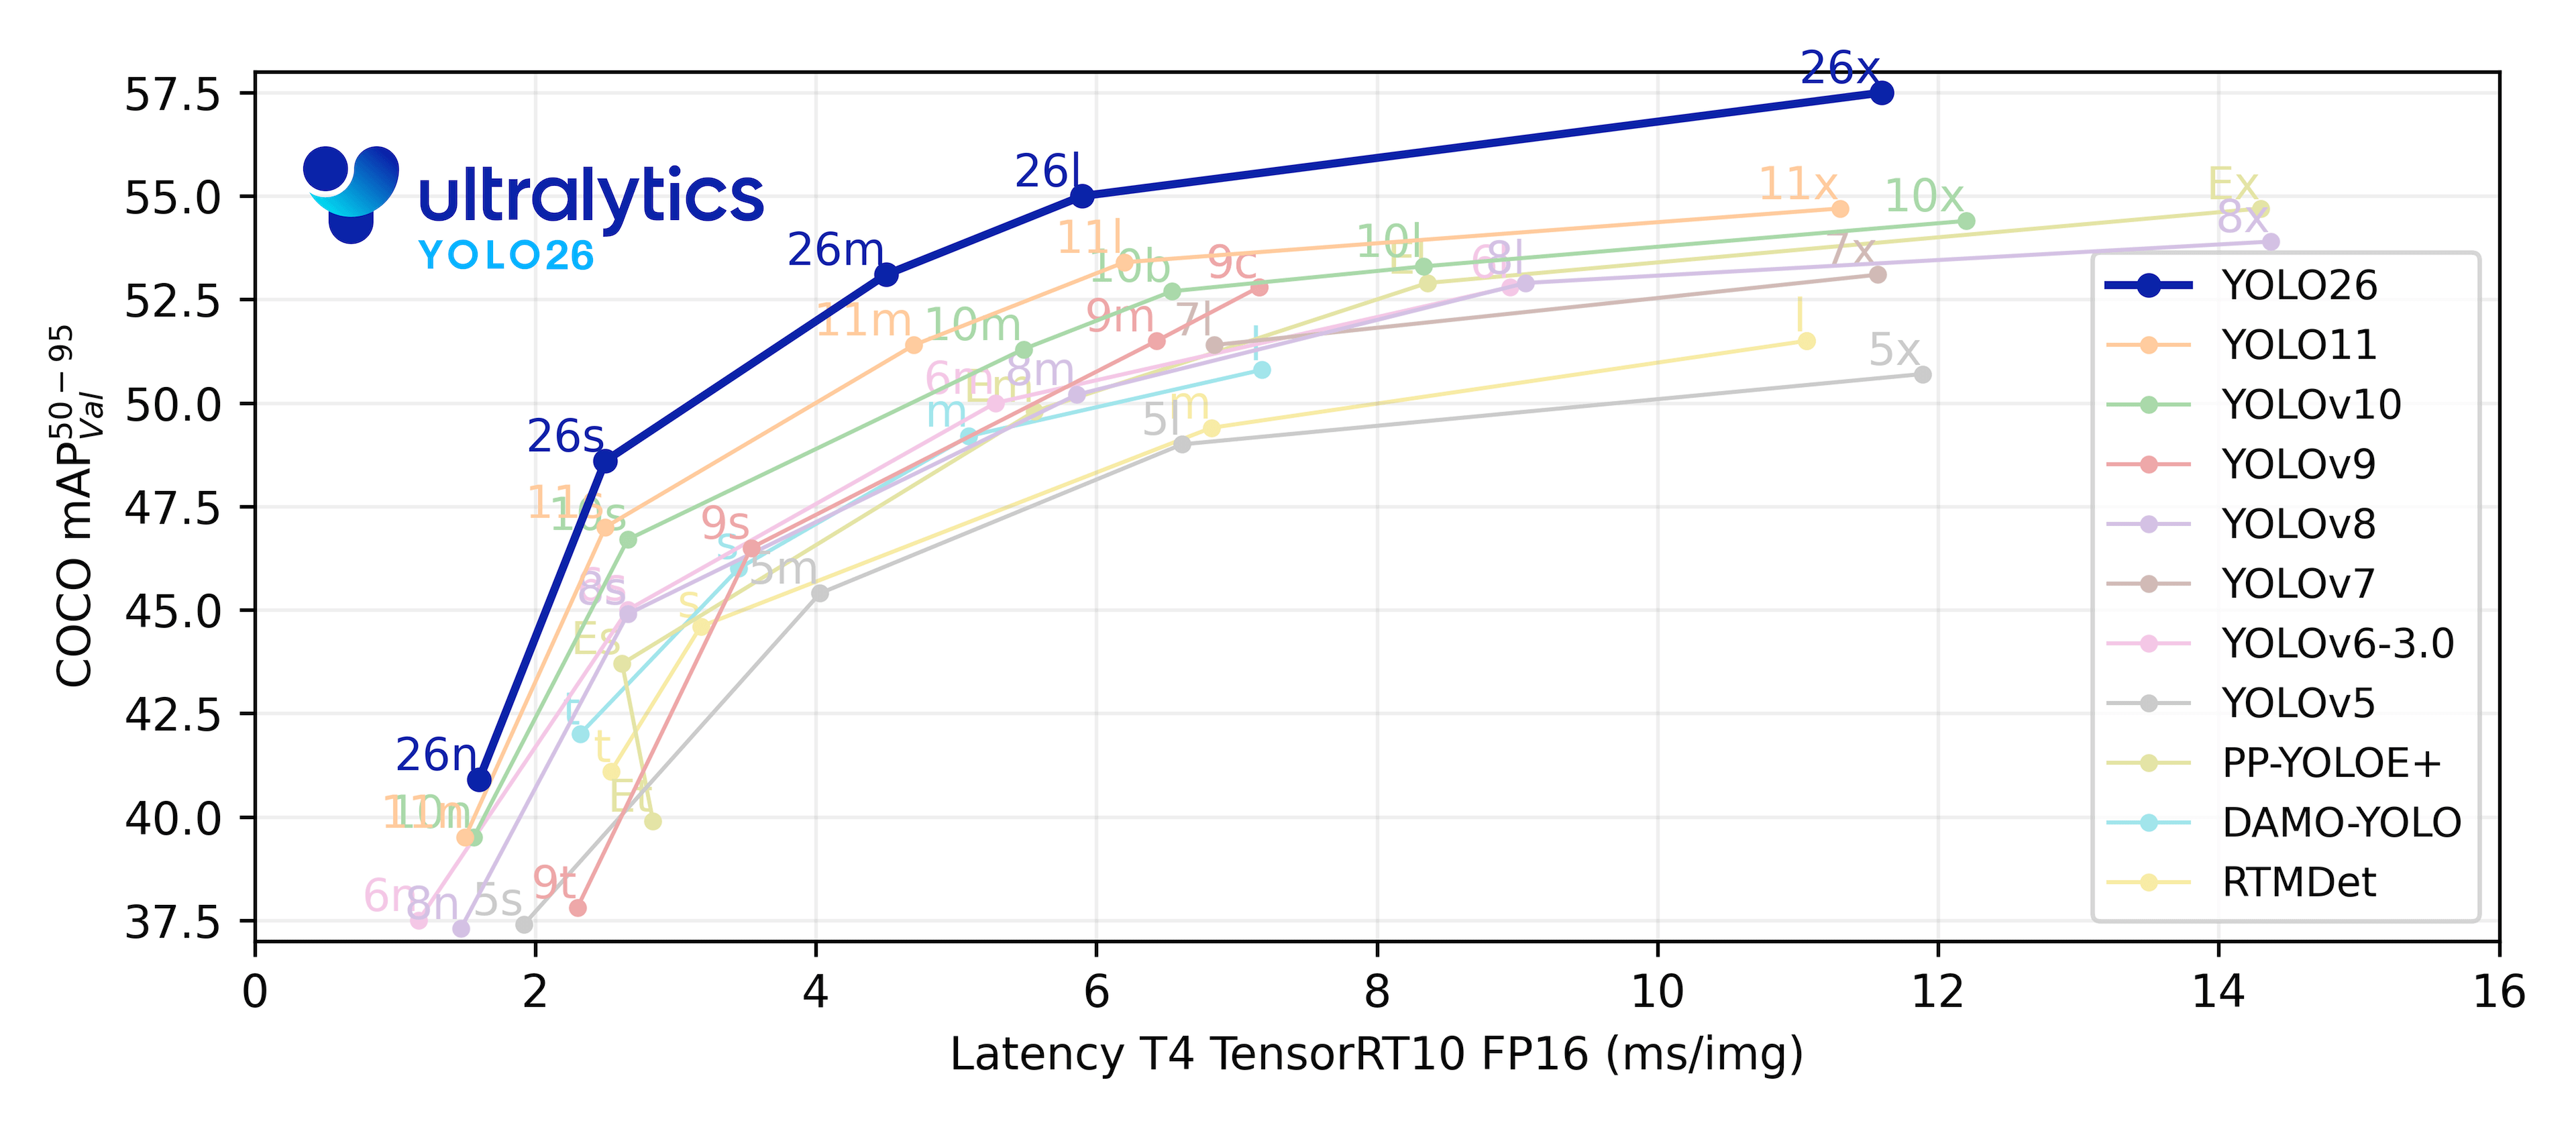
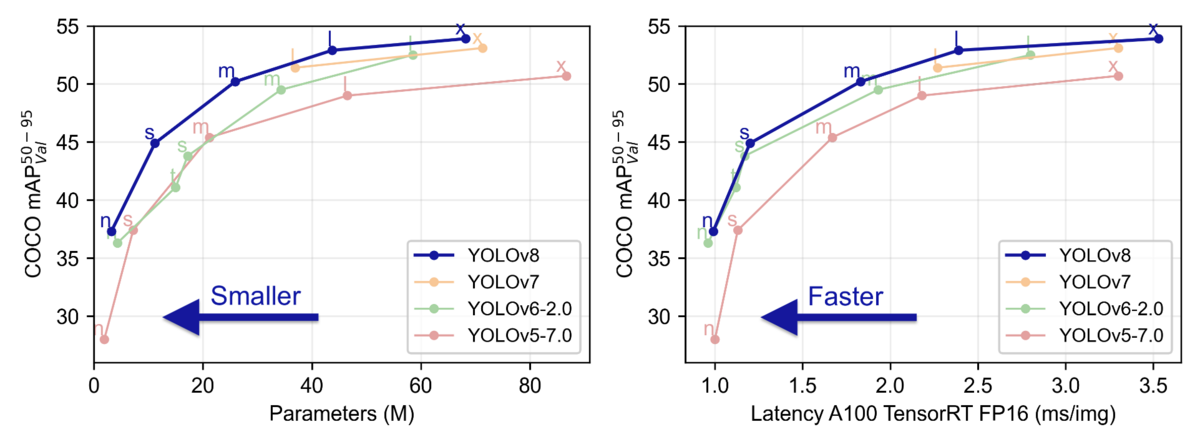
YOLOv8 has five pre-trained model patterns with different model sizes: n, s, m, l, and x. The number of parameters and COCO mAP (accuracy) below show that the accuracy has improved considerably from YOLOv5. In particular, for the larger model sizes l and x, the accuracy improved while the number of parameters was reduced [reference].
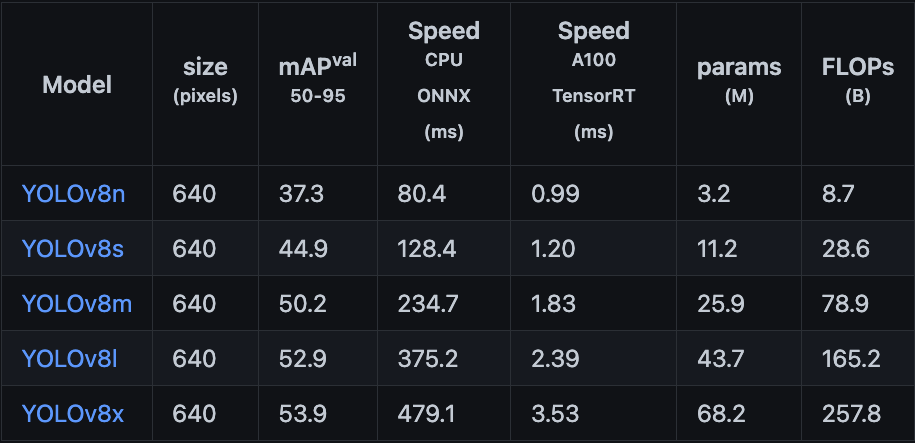
The table below shows the other models' parameters [reference].
5. Changes with YOLOv5
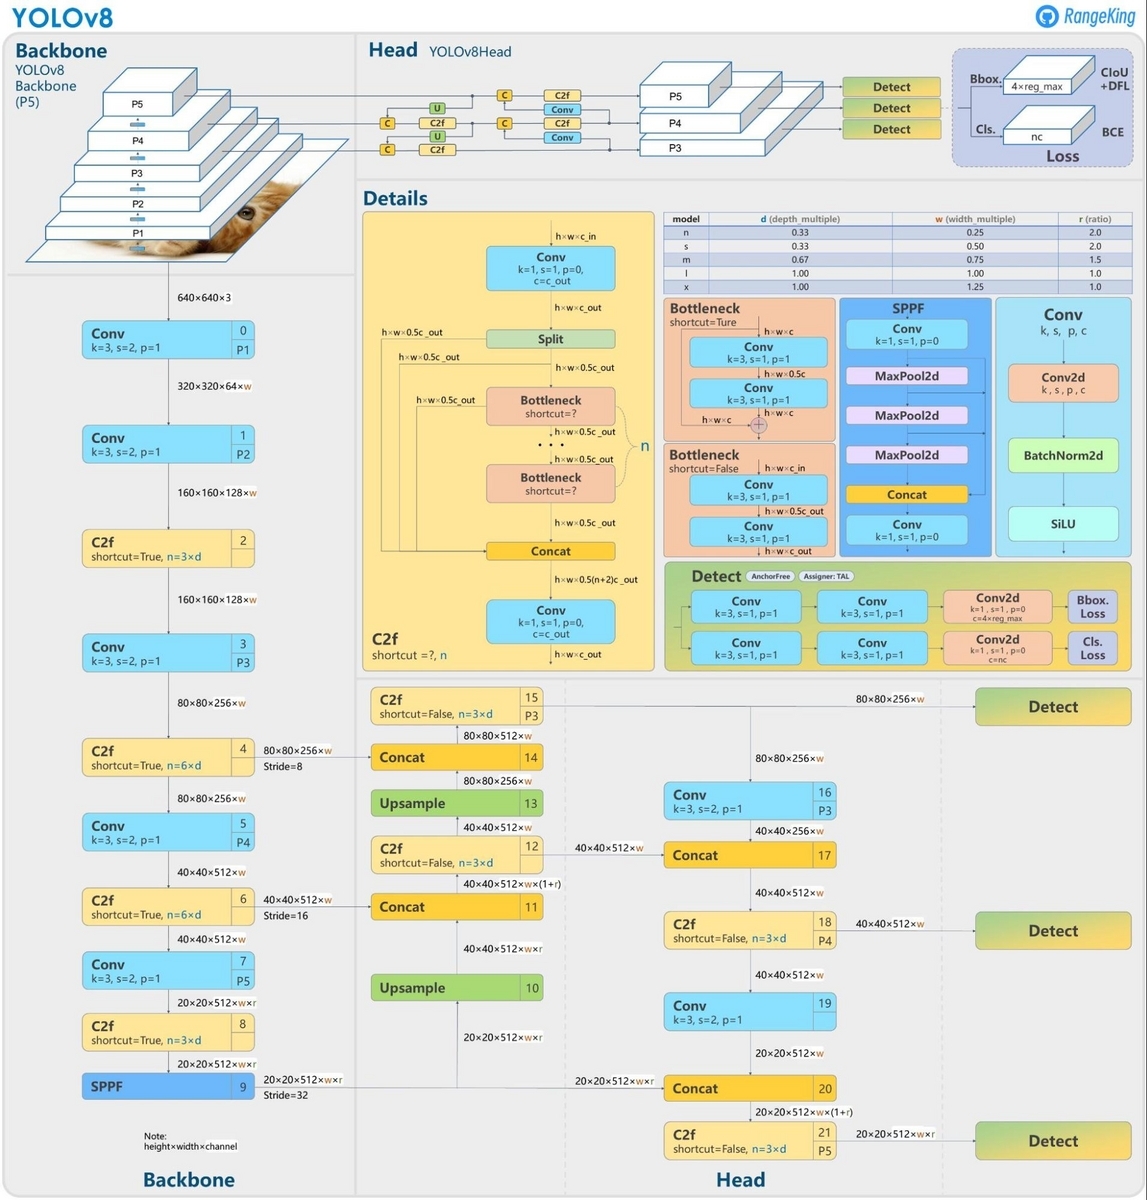
YOLOv8 has several changes from YOLOv5, but two stand out from the rest at the time of this blog post:
- Introduction of C2f layer
- Decoupled head and removal of the objectness branch.
In addition, some conv modules have been removed; kernel size has been changed, among other minor improvements. Although not official, a diagram of the YOLOv8 detection model architecture published by RangeKing is a helpful guide.
6. YOLOv8's building and inference execution
In this chapter, I will install and play some examples in YOLOv8. This time, I will use a pre-trained model to verify how well it works in a M1 MacBook Pro CPU environment.
My environment is as follows:
- MacBook Pro (13-inch, M1, 2020)
- 16GB
- Mac OS Monterey
First, you can install YOLOv8 with the command below.
pip install ultralytics
Now that the installation is complete, let's run it. This time, we will try the inference with a Python script.
Inference on images
First, let's enter the input. This article will use an image showing a bus and a person. The image size is 810x1080.
from ultralytics import YOLO

# load pre-trained model.
model: YOLO = YOLO(model="yolov8n.pt")

# inference
# set save=True to store the resulting image with the inferred results.
result: list = model.predict("https://ultralytics.com/images/bus.jpg", save=True)

Inference on videos
Let's try inference on videos with YOLOv8x , since we used YOLOv8n for images.
The interface is the same, but we pass the path of the video file as an argument.
from ultralytics import YOLO

# load pre-trained model.
model: YOLO = YOLO(model="yolov8x.pt")

# set save=True to store the inferred results.
result: list = model.predict("MOT17-14-FRCNN-raw.mp4", save=True)
This time, we will use the video from the MOT Challenge MOT17 test set. The MOT17 video file is in WebM format, so we converted it to mp4 in advance.
The converted video is 30 seconds long, and the frame rate is 30, so inference is performed on 900 images.
Supplement
Supported video formats
The image and video file formats supported by YOLOv8 are as follows.
- Images: "bmp", "dng", "jpeg", "jpg", "mpo", "png", "tif", "tiff", "webp", "pfm"
- Video: "asf", "avi", "gif", "m4v", "mkv", "mov", "mp4", "mpeg", "mpg", "ts", "wmv"
Definitions of supported file formats in the code are here.
Text output of detection results
When performing inference, saving the detection results as text is often desirable.
# Output an image with the detection results drawn and in text
model.predict("https://ultralytics.com/images/bus.jpg", save=True, save_txt=True)

# Output the detection result and the confidence of each object in the text
model.predict("https://ultralytics.com/images/bus.jpg", save_txt=True, save_conf=True)
Other arguments can be set to the prediction function. Please refer to the official documentation.
Model inputs
Although we have specified a single video path to check the operation, you can pass multiple ones as a list.
source_list: list = ["./sample1.jpg", "./sample2.jpg"]
result: list = model.predict(source_list, save=True)
7. Overview of the inference results for each model
Now that we have built an environment and performed inference let's try it on the YOLOv8 s to l models. In addition to YOLOv5, we will also compare the output results of YOLOv6 and YOLOv7, released within the past year.
This time, we want to compare the accuracy of each model rather than the output of each model from a bird's-eye view.
I will not go into the details of YOLOv5, YOLOv6, and YOLOv7, but if you are interested in these models, please check them out. YOLOv6 (v3.0) is used as the version for YOLOv6 since it was released almost simultaneously with YOLOv8.
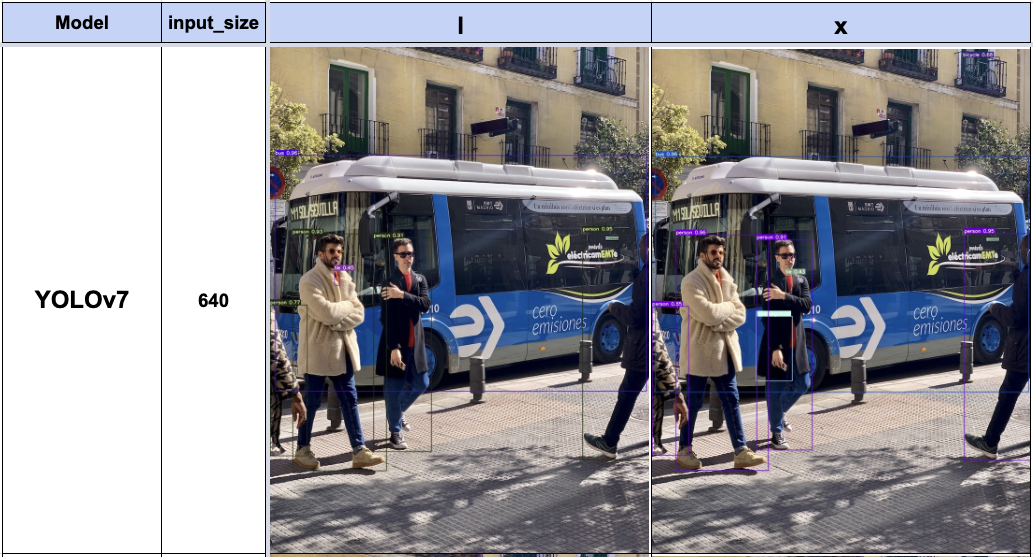
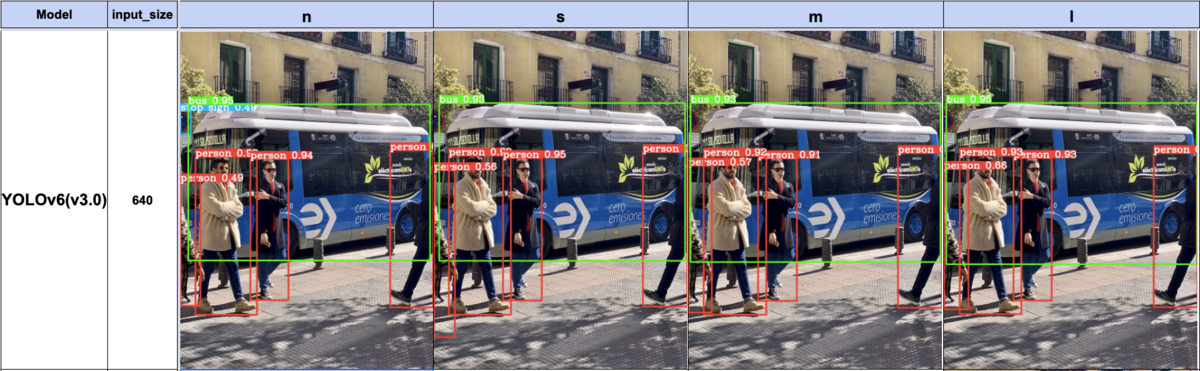
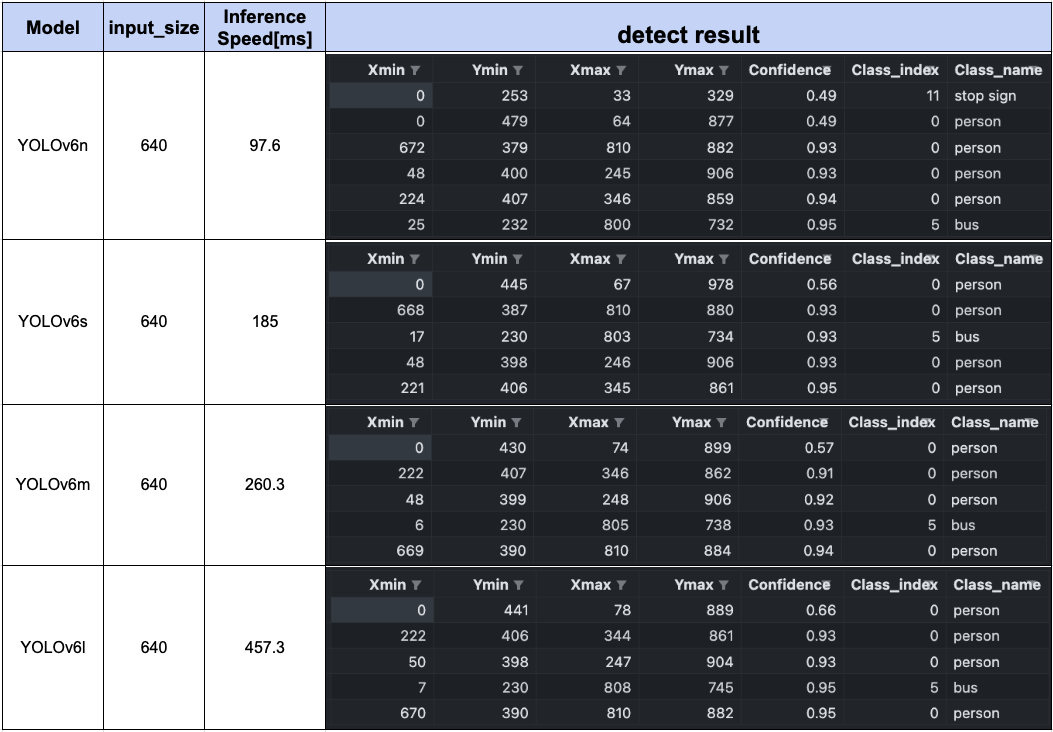
YOLOv8's sample images are used as the target images. The following is a summary of the images depicting the detection results of each model, information on the detected objects, and the inference speed.
YOLOv8


YOLOv7

YOLOv6 (3.0)
YOLOv5
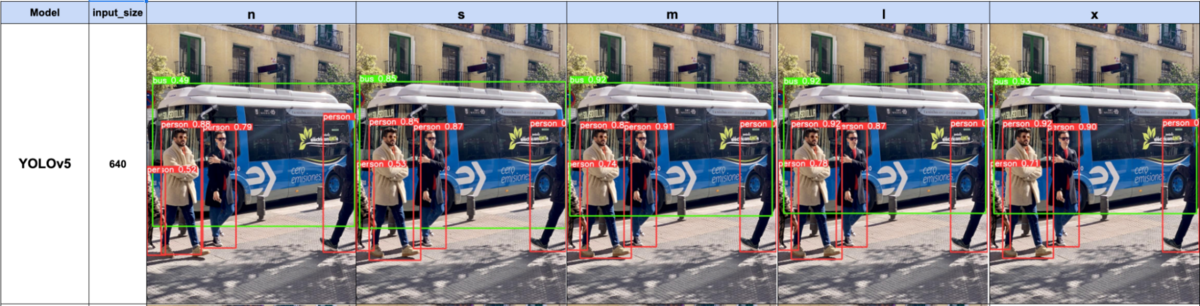

YOLOv8l and x can detect the bicycle in the upper right corner of the image, which was not seen by YOLOv5l and x. The confidence of the detected objects in YOLOv8 shows that it has improved over YOLOv5. All models are fast, although YOLOv7 is slower.
8. Summary
This article has provided an overview of YOLOv8, the differences from previous versions, and a brief description of how to use it. My impressions of YOLOv8 are:
- It is easy to install (run
pip install), easy to use, and has a well-organized interface. - It is simple to convert to onnx, torchscript, etc.
YOLOv5 was also user-friendly, but v8 has improved further in that regard.
Although I have yet to mention model export, it is a valuable tool for exporting models in various formats and executing them efficiently.
References
- https://github.com/ultralytics/ultralytics
- https://docs.ultralytics.com/
- https://github.com/meituan/YOLOv6
- https://github.com/WongKinYiu/yolov7
- https://github.com/ultralytics/yolov5
- https://github.com/ultralytics/ultralytics/issues/189
- https://motchallenge.net/data/MOT17/
- https://blog.roboflow.com/whats-new-in-yolov8/