概要
株式会社RevCommのCorporateEngineeringチームの登尾です。
この記事は 株式会社RevComm Advent Calendar 2023 の 11日目の記事です。
MiiTelのOutgoingWebhook機能を使い応対履歴をGoogleCalendarに残す方法について紹介します。

想定読者
- MiiTel製品の導入検討中の方 : MiiTelのOutgoingWebhook機能でどのようなことができるか知りたい方
- MiiTel製品導入済みの方 : 自社の業務にあわせてMiiTelのカスタマイズを検討している方。カスタマイズの作業を行う開発者の方
MiiTelのOutgoingWebhook 機能について
トーク解析AI の MiiTelには様々な機能があります。詳しくは MiiTel 機能紹介ページをご覧ください。 様々な機能の中の1つの OutgoingWebhook は、「MiiTel Analytics」プラットフォームで解析した結果を、他社システムへ連携可能にします。
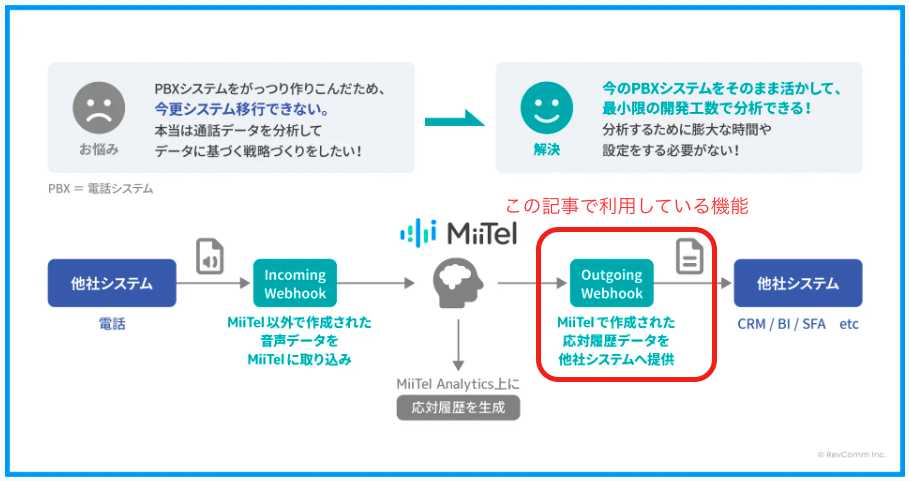
本記事で紹介しているGoogleCalendar連携について
本記事では「MiiTel Analytics」プラットフォームで解析した結果をGoogleCalendarに連携する方法について紹介します。 具体的には、電話が完了し、音声解析が終了すると、GoogleCalendarに通話の応対履歴が自動で登録されます。 流れをスクリーンショットと共に見ていきましょう。
- MiiTelPhoneで電話をかける
 2. 応対履歴が作成される

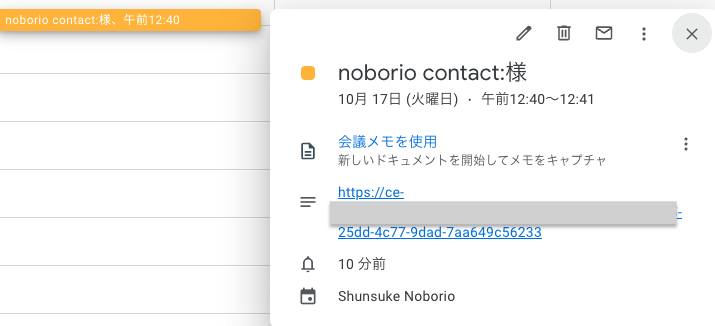
3. GoogleCalendarに応対履歴が連携される。GoogleCalendarの説明文に登録されたリンクからMiiTelの応対履歴ページに戻ることができる
利用想定
この仕組みを使うことで、営業支援システムを導入していない企業様が電話による営業活動を効率化できます。営業担当者の応対履歴がGoogleCalendarに同期され、GoogleCalendarを見ることで誰がどの取引先にどのくらい時間を使ったかを簡易的に見ることができるようになります。
開発者向け情報
概要
OutgoingWebhookを使ってGoogleCalendar連携するには下の2つの実装が必要となります。
- GoogleCalendarにイベント(タイトル、開始時間、終了時間、参加者などの情報を含むカレンダー上のイベント) を登録するための処理
- GoogleCalendarAPIを利用します。GoogleCalendarAPIを使って イベント を登録するには Google の OAuth認証 も必要です。OAuth認証用の処理も作成する必要があります。
- Google の OAuth Appについての詳細は OAuth App Verification Help Center を確認してください。
- MiiTelのOutgoingWebhookのリクエストを受けつけるための処理
- 実装する際には MiiTel OutgoingWebhookのサポートページ で詳細をご確認ください。
全体の処理シーケンス
GoogleCalendarAPI利用時に認証tokenを保存するための処理
今回は簡単に構築するために、 tokenを連携サーバ内にファイルとして保存しました。実際に運用をする際には検討が必要な部分です(図の9番の処理)

通話完了からGoogleCalendarへイベントを登録する処理

事前準備
GoogleCalendarAPIの利用設定
GoogleCloudの左メニューからGoogleCalendarAPIを選択し GoogleCalendarAPIを有効にします

右上のボタンより認証情報を作成します

承認済みの JavaScript 生成元 と 承認済みのリダイレクト URI に 連携サーバのものを指定します

OAuth同意画面で公開ステータスをテスト、テストユーザーにこの連携で利用するメールアドレスを追加します
- OAuthのスコープを指定します

OutgoingWebhookの利用設定
MiiTelAdminの外部連携機能で事前にOutgoingWebhookの設定を行います

設定完了画面

連携サーバの構築
💡 セキュリティ上の注意: サーバを構築する際は、Firewallで不要なポートへのアクセスやアクセス元IPアドレスを制限すること、脆弱性のある古いバージョンのライブラリは利用しない等、セキュリティには十分注意してください。
構成情報
- 構築環境: GCP(Google Cloud Platform)
- アプリケーション: PHP (フレームワークは Slim を利用), nginx
- ドメイン: お名前.comで取得
GCPでサーバ構築
- Compute Engine → Compute Engineを有効化 → VM インスタンス → 新規作成 からサーバを作成します
- CloudDNSでお名前.comで取得したドメインと紐付けます
- https://over40.work/entry/gcp-clouddns/ (こちらのページを参考にさせていただきました。ありがごうございました)
PHPのインストール
sudo apt update
sudo apt install php-cli php-fpm php-json php-common php-mbstring curl unzip

curl -sS https://getcomposer.org/installer | php
sudo mv composer.phar /usr/local/bin/composer
sudo timedatectl set-timezone Asia/Tokyo

mkdir relation_app
cd relation_app

composer require slim/slim:"4.*"
composer require slim/psr7
composer require guzzlehttp/guzzle
composer require google/auth
composer require google/apiclient
Nginxの設定
- インストール
sudo apt install nginx
sudo systemctl start nginx
sudo systemctl enable nginx

# 証明書に無料の Let’s encript を利用
sudo apt install certbot python3-certbot-nginx
- nginxのconf設定
# HTTPのリクエストをHTTPSにリダイレクト
server {
    listen 80;
    listen [::]:80;
    server_name **********;

    location / {
        return 301 https://$host$request_uri;
    }
}

# HTTPSの設定
server {
    listen 443 ssl;
    server_name **********;

    root /home/sh-noborio/relation_app;
    index index.php index.html index.htm index.nginx-debian.html;

    ssl_certificate /etc/letsencrypt/live/**********/fullchain.pem;
    ssl_certificate_key /etc/letsencrypt/live/**********/privkey.pem;
    include /etc/letsencrypt/options-ssl-nginx.conf;
    ssl_dhparam /etc/letsencrypt/ssl-dhparams.pem;

    location / {
        try_files $uri $uri/ /index.php$is_args$args;
    }

    location ~ \.php$ {
        try_files $uri =404;
        fastcgi_pass unix:/run/php/php7.4-fpm.sock;
        fastcgi_index index.php;
        fastcgi_param SCRIPT_FILENAME $document_root$fastcgi_script_name;
        include fastcgi_params;
    }
}
OAuth用の処理
シーケンス図
PHPのコード(一部抜粋)
- ルーティング処理、他APIの呼び出し
<?php
namespace calendar;

use Psr\Http\Message\ResponseInterface as Response;
use Psr\Http\Message\ServerRequestInterface as Request;
use Slim\Factory\AppFactory;

require __DIR__ . '/vendor/autoload.php';

$app = AppFactory::create();

// GoogleOAuthLogin画面へ遷移するためのページ
// シーケンス図 3番,4番の処理
$app->get('/google_oauth', function (Request $request, Response $response, $args) {

    $client = new GoogleOAuthClient();
    $url = $client->getAuthUrl();
    $response->getBody()->write('<button onclick="window.location.href=\'' . $url . '\';">Google OAuth</button>');

    return $response;
});

// OAuthのcodeを受け取ってtokenを保存するための処理
// シーケンス図 6番〜9番の処理
$app->get('/google_oauth_callback', function (Request $request, Response $response, $args) {
    $params = $request->getQueryParams();
    if (isset($params['code'])) {
        $authCode = $params['code'];
        $client = new GoogleOAuthClient();
        $token = $client->fetchAndSaveToken($authCode);

        $response->getBody()->write("Token saved successfully!");
        return $response;
    } else {
        $response->getBody()->write("Error: No authorization code received.");
        return $response->withStatus(400);
    }
});
- GoogleOAuth用の処理
<?php

namespace calendar;

use GuzzleHttp\Client;
use Google\Auth\OAuth2;

class GoogleOAuthClient
{
    const CLIENT_ID = '************';
    const SCOPES = 'https://www.googleapis.com/auth/calendar openid email';
    const REDIRECT_URI = 'https://**********/google_oauth_callback';
    const CLIENT_SECRET = '***';

    public function getAuthUrl()
    {
        $oauth2 = new OAuth2([
            'clientId' => self::CLIENT_ID,
            'authorizationUri' => 'https://accounts.google.com/o/oauth2/v2/auth',
            'redirectUri' => self::REDIRECT_URI,
            'tokenCredentialUri' => 'https://oauth2.googleapis.com/token',
            'scope' => self::SCOPES,
        ]);
        return $oauth2->buildFullAuthorizationUri();
    }

    /**
     * codeを使ってアクセストークンを取得しファイルとして保存する
     * シーケンス図 7番〜9番の処理
     */
    public function fetchAndSaveToken($authCode)
    {
        $oauth2 = new OAuth2([
            'clientId' => self::CLIENT_ID,
            'redirectUri' => self::REDIRECT_URI,
            'tokenCredentialUri' => 'https://oauth2.googleapis.com/token',
            'grant_type' => 'authorization_code',
        ]);
        $oauth2->setCode($authCode);

        // アクセストークンを取得
        $client = new Client();
        $response = $client->post($oauth2->getTokenCredentialUri(), [
            'form_params' =>
            [
                'code' => $authCode,
                'client_id' => self::CLIENT_ID,
                'client_secret' => self::CLIENT_SECRET,
                'redirect_uri' => self::REDIRECT_URI,
                'grant_type' => 'authorization_code',
                'access_type' => 'offline',
                'prompt' => 'consent',
            ]

        ]);

        $token = json_decode($response->getBody(), true);
        $mail = $this->getEmailFromToken($token);

        // トークンをファイルに保存
        file_put_contents($this->getTokenPath($mail), $token['access_token']);

        return $token;
    }

    public function getEmailFromToken($token)
    {
        if (isset($token['id_token'])) {
            $idToken = $token['id_token'];
            list($header, $payload, $signature) = explode('.', $idToken);

            // Decode payload
            $decodedPayload = json_decode(base64_decode(strtr($payload, '-_', '+/')), true);

            return $decodedPayload['email'] ?? null;
        }
        return null;
    }
カレンダー登録処理
シーケンス図
PHPのコード(一部抜粋)
- ルーティング処理、他APIの呼び出し
<?php
namespace calendar;

use Psr\Http\Message\ResponseInterface as Response;
use Psr\Http\Message\ServerRequestInterface as Request;
use Slim\Factory\AppFactory;

require __DIR__ . '/vendor/autoload.php';

$app = AppFactory::create();

// webhookリクエストを受け付け
// シーケンス図 3番〜6番の処理
$app->post('/webhook', function (Request $request, Response $response, $args) {

    $body = $request->getBody()->getContents();
    $webhook_response = new OutgoingWebhookResponse($body);

    // 外線発信以外 または Email が取れない場合は処理停止
    if (!$webhook_response->isOutGoingCall()  || !$webhook_response->getEmailAddress()) {
        return $response;
    }

    // 初回のチャレンジレスポンスのための処理
    if ($webhook_response->getChallenge()) {
        $response->getBody()->write($webhook_response->getChallenge());
            $response->withHeader('Content-Type', 'text/plain');
            return $response;
    }

    $title = $webhook_response->getCompanyName() . ':' . $webhook_response->getName() . '様';
    $start_date = $webhook_response->getAnsweredAt();
    $end_date = $webhook_response->getEndsAt();
    $id = $webhook_response->getId();

    // GoogleCalendarにEventを登録
    $googleOAuthClient = new GoogleOAuthClient();
    $event = $googleOAuthClient->createEvent(
        $mail,
        $title,
        $id,
        $start_date,
        $end_date
    );

    $response->withHeader('Content-Type', 'text/plain');
    return $response;
});
- OutgoingWebhookのResponse用の処理
<?php

namespace calendar;

/**
 * @see 音声認識終了時にチェックを入れた場合のペイロード https://support.miitel.jp/hc/ja/articles/13050493066905-Outgoing-Webhook
 */
class OutgoingWebhookResponse {

    private $data;

    public function __construct($json) {
        $this->data = json_decode($json, true);
    }

    public function getEmailAddress() {
        if ($this->data['call']['details'][0]['call_type'] === 'OUTGOING_CALL') {
            foreach ($this->data['call']['details'][0]['participants'] as $participant) {
                if ($participant['from_to'] === 'FROM') {
                    return $participant['name'] ?? null;
                }
            }
        }
        return null;
    }

    public function getChallenge() {
        return $this->data['challenge'] ?? null;
    }

    public function getAnsweredAt() {
        return $this->data['call']['details'][0]['dial_answered_at'] ?? null;
    }

    public function getEndsAt() {
        return $this->data['call']['details'][0]['dial_ends_at'] ?? null;
    }

    public function getCompanyName() {
        if ($this->data['call']['details'][0]['call_type'] === 'OUTGOING_CALL') {
            foreach ($this->data['call']['details'][0]['participants'] as $participant) {
                if ($participant['from_to'] === 'TO') {
                    return $participant['company_name'] ?? '';
                }
            }
        }
    }

    public function getName() {
        if ($this->data['call']['details'][0]['call_type'] === 'OUTGOING_CALL') {
            foreach ($this->data['call']['details'][0]['participants'] as $participant) {
                if ($participant['from_to'] === 'TO') {
                    return $participant['name'] ?? '';
                }
            }
        }
    }

    public function getId() {
        return $this->data['call']['id'] ?? '';
    }

    public function isOutGoingCall() {
        return isset($this->data['call']['details'][0]['call_type']) && $this->data['call']['details'][0]['call_type'] === 'OUTGOING_CALL';
    }
}
- GoogleCalendarにEventを登録する処理
<?php

namespace calendar;

use GuzzleHttp\Client;
use Google\Auth\OAuth2;

class GoogleOAuthClient
{
    const CLIENT_ID = '************';
    const SCOPES = 'https://www.googleapis.com/auth/calendar openid email';
    const REDIRECT_URI = 'https://**********/google_oauth_callback';
    const CLIENT_SECRET = '***';
    const MIITEL_URL = 'https://***********/miitel.jp';

    /**
     * @see https://developers.google.com/calendar/api/v3/reference/events/insert?hl=ja
     */
    public function createEvent($mail, $title, $id, $startDateTime, $endDateTime)
    {
        // Googleクライアントの初期化
        $client = new \Google_Client();
        $client->setClientId(self::CLIENT_ID);
        $client->setClientSecret(self::CLIENT_SECRET);
        $client->setRedirectUri(self::REDIRECT_URI);
        $client->addScope(self::SCOPES);

        // 保存されているトークンの読み込み
        $tokenPath = $this->getTokenPath($mail);
        $accessToken = file_get_contents($tokenPath);

        $client->setAccessToken($accessToken);

        // Googleカレンダーにイベントを登録
        $service = new \Google_Service_Calendar($client);
        $url = self::MIITEL_URL . "/app/calls/{$id}";
        $event = new \Google_Service_Calendar_Event([
            'summary' => $title,
            'description' => $url,
            'start' => ['dateTime' => $startDateTime],
            'end' => ['dateTime' => $endDateTime]
        ]);
        $createdEvent = $service->events->insert('primary', $event);

        return $createdEvent;
    }
}
おわりに
いかがでしたでしょうか。
OutgoingWebhookを使えば、他のサービスとの連携ができ、様々な応用が可能になります。
例えばAsanaとの連携によるタスク管理の実現も可能です。
MiiTel Outgoing Webhook の使い方: タスク管理ツールとの連携サンプル をご覧ください。
MiiTelをより効果的に、より深く活用したい企業様は、OutgoingWebhookの機能をぜひご活用ください。